Playing Switch games at 4K
May 17, 2022
After working on plex-placebo, I realised that I could potentially use Anime4K for upscaling my Switch games. Turns out it works perfectly! Nowadays, you can get a 1080p60 capture card for ~AUD$120, so it’s essentially a $120 upgrade to play Switch games on your PC at up to 4K – totally worth it imo.
TLDR: use a capture card, and use mpv to stream it with the Anime4K shaders loaded.
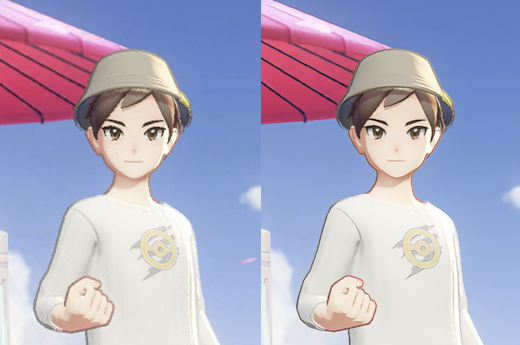 Check out how crispy those lines are!
Comparison screenshots (1440p)
I suggest fullscreening your browser with F11 first before checking these out! You can click to zoom and use the arrow keys to go back and forth to compare. These screenshots are from using the high-end GPU, B+B set of shaders.
Home screen
| Before | After |
|---|---|
 |
 |
Pokemon Unite - home screen
The text is a little bit “painterly”, but that’s an acceptable tradeoff for the massive clarity improvement.
| Before | After |
|---|---|
 |
 |
Pokemon Unite - in game
| Before | After |
|---|---|
 |
 |
Pokemon Shield
Pokemon Shield has a low internally rendered resolution, so it has really bad blurring and aliasing. Some of these make it through the upscaling as artifacts and flickering, but it’s still better than the original image imo.
| Before | After |
|---|---|
 |
 |
 |
 |
Overcooked
Probably the least improvement out of all them.
| Before | After |
|---|---|
 |
 |
Instructions:
Unfortunately, I don’t have a native Linux install at the moment as I mostly use WSL (which doesn’t support USB devices without a kernel patch), so instructions are only for Windows right now.
- Buy a capture card that supports 1080p60. If you’re playing anything competitive or you’re sensitive to latency, I would shell out the cash for a well known, good capture card (and not the cheap $30 ones). Some of the cheaper ones lie about their specifications and only support 1080p30 or 720p60, and they have pretty bad latency e.g. ~100ms. It’s still a lot better than what the capture card market used to be just a couple of years ago though! You can find a list of popular capture cards and their latencies here.
- Dock your Switch
- Connect the HDMI to a capture card
- Download and install FFmpeg: https://ffmpeg.org
- Download mpv: https://mpv.io
- Follow these instructions to download and install the Anime4K mpv shaders: https://github.com/bloc97/Anime4K/blob/master/md/GLSL_Instructions_Windows.md. You can persist the shaders permanently on mpv startup by editing your
mpv.confto haveglsl-shaders="~~/shaders/Anime4K_Clamp_Highlights.glsl;...". - Run
ffmpeg -hide_banner -list_devices true -f dshow -i dummyto get a list of your video input devices. You should get an output like this:[dshow @ 00000299ca43b780] "HD Pro Webcam C920" (video) [dshow @ 00000299ca43b780] Alternative name "@device_pnp_\\?\usb#vid_046d&pid_082d&mi_00#7&1e0b1105&1&0000#{65e8773d-8f56-11d0-a3b9-00a0c9223196}\global" [dshow @ 00000299ca43b780] "Live Gamer Ultra-Video" (video) [dshow @ 00000299ca43b780] Alternative name "@device_pnp_\\?\usb#vid_07ca&pid_0553&mi_00#7&161a77bd&0&0000#{65e8773d-8f56-11d0-a3b9-00a0c9223196}\global" [dshow @ 00000299ca43b780] "Logi Capture" (video) [dshow @ 00000299ca43b780] Alternative name "@device_sw_{860BB310-5D01-11D0-BD3B-00A0C911CE86}\{4A2FEA90-B0A0-438E-8BC3-D84157660D0A}" [dshow @ 00000299ca43b780] "screen-capture-recorder" (video) [dshow @ 00000299ca43b780] Alternative name "@device_sw_{860BB310-5D01-11D0-BD3B-00A0C911CE86}\{4EA69364-2C8A-4AE6-A561-56E4B5044439}" [INFO] [DSH] ffmpeg.exe [INFO] [DSH] Creating WndMsg Listener Window [INFO] [DSH] Destroying object [INFO] [DSH] Destroying WndMsg Listener Window [INFO] [DSH] Destroyed window [INFO] [DSH] Unregistered window class [dshow @ 00000299ca43b780] "Camera (NVIDIA Broadcast)" (video) [dshow @ 00000299ca43b780] Alternative name "@device_sw_{860BB310-5D01-11D0-BD3B-00A0C911CE86}\{7BBFF097-B3FB-4B26-B685-7A998DE7CEAC}" [dshow @ 00000299ca43b780] "OBS Virtual Camera" (video) [dshow @ 00000299ca43b780] Alternative name "@device_sw_{860BB310-5D01-11D0-BD3B-00A0C911CE86}\{A3FCE0F5-3493-419F-958A-ABA1250EC20B}" [dshow @ 00000299ca43b780] "HDMI (Live Gamer Ultra-Audio)" (audio) [dshow @ 00000299ca43b780] Alternative name "@device_cm_{33D9A762-90C8-11D0-BD43-00A0C911CE86}\wave_{E0BCD63D-6CC1-494F-8C96-85F640A90DE5}" [dshow @ 00000299ca43b780] "virtual-audio-capturer" (audio) [dshow @ 00000299ca43b780] Alternative name "@device_sw_{33D9A762-90C8-11D0-BD43-00A0C911CE86}\{8E146464-DB61-4309-AFA1-3578E927E935}" [dshow @ 00000299ca43b780] "Line (3- Steinberg UR12 )" (audio) [dshow @ 00000299ca43b780] Alternative name "@device_cm_{33D9A762-90C8-11D0-BD43-00A0C911CE86}\wave_{1DCDF89F-D9EE-4EB3-9AAA-8734621262F1}" [dshow @ 00000299ca43b780] "VoiceMeeter Aux Output (VB-Audio VoiceMeeter AUX VAIO)" (audio) [dshow @ 00000299ca43b780] Alternative name "@device_cm_{33D9A762-90C8-11D0-BD43-00A0C911CE86}\wave_{4B43038E-8341-460C-A2BF-E9583EA6ACFE}" [dshow @ 00000299ca43b780] "Microphone (HD Pro Webcam C920)" (audio) [dshow @ 00000299ca43b780] Alternative name "@device_cm_{33D9A762-90C8-11D0-BD43-00A0C911CE86}\wave_{6076A483-B090-4CD0-8E9B-4D06A71E9A2D}" [dshow @ 00000299ca43b780] "VoiceMeeter Output (VB-Audio VoiceMeeter VAIO)" (audio) [dshow @ 00000299ca43b780] Alternative name "@device_cm_{33D9A762-90C8-11D0-BD43-00A0C911CE86}\wave_{8527CDAF-8DCC-43E2-B373-814B5BE03E25}" [dshow @ 00000299ca43b780] "VoiceMeeter VAIO3 Output (VB-Audio VoiceMeeter VAIO3)" (audio) [dshow @ 00000299ca43b780] Alternative name "@device_cm_{33D9A762-90C8-11D0-BD43-00A0C911CE86}\wave_{E6891ACA-1703-47E5-B6E1-FF9E021EF7F8}" [dshow @ 00000299ca43b780] "Microphone (Steam Streaming Microphone)" (audio) [dshow @ 00000299ca43b780] Alternative name "@device_cm_{33D9A762-90C8-11D0-BD43-00A0C911CE86}\wave_{EBC431C2-E37F-495C-B694-E46B1799F9D7}" dummy: Immediate exit requestedFind your video and audio device that match your capture card (in my case, it’s
Live Gamer Ultra-VideoandHDMI (Live Gamer Ultra-Audio)). On my cheaper generic capture card, it wasUSB VideoandDigital Audio Interface (USB Digital Audio). - Create a shortcut to
mpv.exe. Edit the shortcut via right clicking the shortcut -> Properties, and addav://dshow:video="YourVideoDevice" --profile=low-latency --untimedto the end of the Target field. The full target should look something likeC:\Users\YourUsername\Documents\mpv\mpv.exe av://dshow:video="Live Gamer Ultra-Video" --profile=low-latency --untimed - Unfortunately, it seems that adding the audio channel into mpv adds a significant amount of latency regardless of any low latency / no buffer settings. To get audio working, you can either:
- Install something like Voicemeeter. Under Hardware Input 1, select your capture card’s audio device. Under Hardware Out A1, select the audio device you usually use as an output. Then, pipe the capture card’s audio to your output by clicking the “A” in a circle in the Hardware Input 1 column.
- Enable loopback in your Windows settings: right click the volume icon in your system tray, and click the “Sounds” option. Then go to the “Recording” tab, double click your capture card’s audio device, go to the “Listen” tab, check “Listen to this device” and then click apply.
- Power on your Switch, and run the mpv shortcut you made. You should hopefully see your Switch homepage. You can swap between the different Anime4K profiles with CTRL+1-5.
Using a 720p60 capture card
Some cheaper cards only run at 720p 60fps and 1080p 30fps. My preference is to use 720p for the higher framerates, but mpv will use the 1080p stream by default. In order to force 60fps, add the following to your shortcut: --demuxer-lavf-o=video_size=1280x720,framerate=60.
But how’s the latency?
Very good! Pretty much unnoticeable to the naked eye when comparing a passthrough HDMI vs the post-upscaled mpv stream. I had to record it using super slow-mo on my phone (960fps) to be able to see any difference. I manually counted about ~21 frames delay in the output 30fps video (700ms), so at a 960/30 = 32x slowdown, that is about 22ms of latency.
I’m not entirely sure how I have less latency than the results in the capture card comparisons I linked in Step 1 of my instructions, perhaps since mpv is running fully unbuffered? Take my measurements with a grain of salt, I only did it with my smartphone in 2 minutes (which could be doing post-processing, interpolation, etc) and I didn’t do any extensive testing with a proper lag tester.
Here’s a 1080p60 comparison video – can you tell which is which?